This video showcases my method or protocol to prepare quick & easy videos for my learners. I am a librarian working in a University in Canada and I use free software, namely Quicktime, to produce these instructional support materials. This video is hosted here: https://youtu.be/62sy1xJG4YY
Here is the outline of the video:
1. Before you begin: Create a new user account; Fix accessibility settings; Lights, camera, outline
2. During the video capture: Be yourself, pretend a friend is with you; 10 minutes max; Don’t edit, throw away & start over
3. Post production and uploading: This outline is your description on YouTube; Use YouTube’s tools for post production
I have prepared a 10 minute video about how I produce my instructional videos. It has taken me about a decade to arrive at this workflow, I’ve transformed my practice long ago to harness the potential of new technologies, tools and platforms. My goal is to share with you my playful and underwhelming method to make simple but useful videos.
Please don’t feel like you should put yourself “out there” as I have. As a middle-aged, overqualified and, well, tenured, white male, I am well aware that I can leverage many factors in my favour to curate an Internet persona. Please focus on the production method (QuickTime hack & inexpensive computer equipment), not the dissemination strategy (YouTube & posting on a blog available on the Internet).
I simply use QuickTime, my old computer with an onboard mic and camera and zero editing (ok, I have a nice external microphone which is 10 years old, but you really don’t need it). It is available on my YouTube channel and embedded in my work blog, at this address: https://youtu.be/62sy1xJG4YY
Of course, this is the workflow I’ve implemented for my own practice in supporting my community: hundreds of faculty and thousands of students from the Marketing & Management departments of the John Molson School of Business at Concordia University. These diverse and energetic colleagues and learners require a special kind of library service, which goes well beyond the canonical book-article paradigm of librarianship. (Actually, most of my colleagues go well beyond the book-article paradigm, but I need to speak to what people perceive librarians to be).
I say this because there are passionate and smart people working on various “video production workflows” at my institution, Concordia University, and elsewhere. Please consider this video as “a” possible method, the one I’ve crafted that I am now sharing with you. It works for me and maybe you’ll feel empowered or inspired to try your hand at creating your own videos… Please remember to consult with your institutional experts about best practices that are meaningful for your local community.
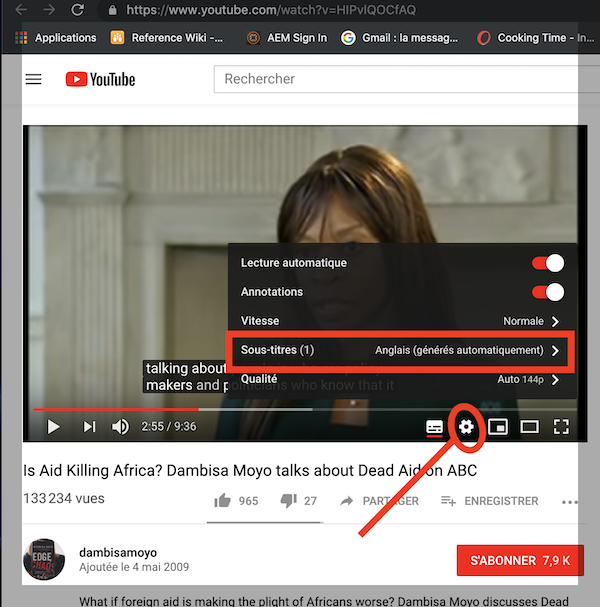
Closed captions or transcribed video is a great idea for your YouTube videos. It allows watchers to follow along is a loud environment (like public transport) as well as offering the hearing impaired an opportunity to partake. Of course, learners of a new language can also use the transcription service to read the words as people speak.
Here are some simple steps to follow to add captions to any YouTube video. Take this example:
To add closed captions, follow these steps:
Click on the settings tool on the YouTube video interface (looks like a gearwheel) ** within ** the video pane
Select subtitles: automatic
Let Google’s AI do all of the heavy linguistic lifting.
The image below shows you hot to do this. Notice that my computer is configured in French, but that doesn’t matter, you get the idea:
Then, you can copy-paste the transcript by using the interface. Here’s how:
Click on the “more options” icon – the three grey dots next to the “save” option ** below ** the video
Another colleague of mine has been trying to create their own plagiarism / citation videos in French using simple tools, like a voice over of a presentation. The videos are interesting but the sound could be a bit better.
In addition, a colleague of mine indicated that this book on academic authorship discusses plagiarism:
Belcher, Wendy Laura, 2009. Writing your journal article in 12 weeks: A guide to academic publishing success, Sage Publications: Thousand Oaks, USA. Pages 161-163.
Educause has a piece on what makes instructional vidoes compelling. Little surprise, the most viewed have content dealing directly with course activities.
I am happy to announce the launch of a new batch of tutorials on YouTube, the first of which is on PMB, the print measurement bureau:
[youtube http://www.youtube.com/watch?v=ce2dYzFYowE&w=560&h=315]
This video follows a new template I have devised for my blended learning initiative to bring information literacy to my students. I want to replace my in-class lectures with self-mediated learning at home and hands-on exercises in class.
I often get asked about how I create these so I want to share my process with you. I currently have an earlier set of videos on my personal channel but I want to reshoot all of them following the process I outline below. These will be available on a new dedicated YouTube channel.
Background
I have been a business librarians for over a decade and I have delivered hundreds of library training sessions on locating valuable information. My main community is comprised of students taking the Entrepreneurship class at Concordia Univeristy’s John Molson School of Business. Seeing that there are over 30 sections a year of the Entrepreneurship course and only one of me, I was not able to meet the demand for dedicated instruction on locating business information.
I have bought some gear to test various methods of creating tutorials. Of all these toys, I find that two are essential: my 15-inch MacBook laptop (actually, any Mac will do as long as there is enough disk-space and processing power) as well as a professional-grade table-top microphone, the Yeti from Blue Microphones in my case. On my Mac, I find all the software I need to produce the videos and I find that one needs an external microphone as the one included on the Macs sounds poor on a higher quality system such as one using a public announcement (PA) system in a classroom.
Also, I use an external keyboard and mouse when shooting my video. I find that taping on the laptop’s keyboard or using the track-pad makes the screen wobble. Because that is where the video camera shoots from, it makes the video seem like you are on a boat. I prod my laptop on an old dictionary and work from an USB keyboard & mouse.
Software
No, I do not use any special software to screen-capture, I just use good old QuickTime. If you look at the “File” menu on the software, you find that you can launch a “New screen capture” and “New video” right from QuickTime. I just do both at the same time! I shoot a “High” quality video of my talking head with the MacBook’s camera and the Yeti mic as well as a soundless “High” quality screen-capture video. Both with QuickTime, at the same time.
This gives me 2 video files, which I then mix, match and edit in iMovie, also included for free on my MacBook. In iMovie, you have to go to the preferences to enable the advanced tools and then, you can create the image-in-image effect by draging one file to the other in the video editing screen. I also really want to experiment with blue-screens, which I will do with a 5 dollar tarp from Canadian Tire…
The trick is to “merge” the two video files in iMovie and then to edit the scenes from this main stream. I try to say out-loud when I click somewhere, to help learners follow what I am doing on-screen. This also assists with post-production. If you want to edit a part out, you can right-click on the spot you want to cut out to “split” it, you just have to do it at the same spot for both files… I will probably do a training video on how to do this soon…
Another trick is to go to your Mac’s preferences and change the size of the mouse cursor. I find it is easier to follow if your pointer is huge. In the preferences, access the “accessibility” options and you can toggle the size of the cursor.
Tone, look & feel
It took me a while to experiment with the look and feel of my videos. I got much help from Concordia’s Center for Teaching & Learning on my first set. Then, I tried different venues and modes to shoot them myself. I tried to lecture-capture in the classroom, but I could never get the sound or the lighting right. Also, the flow was off – there is nothing worse than a 60 minute lecture, with bad sound and lighting when FaceBook and other digital distractions are just a click away.
I find the best ones come from a relaxed and personal tone. I try to be myself and imagine I am explaining this to a distant friend or colleague. Warm and close, but still professional. Some personality is good, as you want your learners to feel they are interacting with a person.
I shoot the videos in my home office as I find the backdrop much nicer – those are my graphic novels and other fun readings I keep there. I also have better lighting with 2 windows on the corner of my home, which I supplement with 2 inexpensive LED reading lamps, one aimed at my face and a closer one pointed on my table in front of me. I find that my neighborhood a better and quieter place to shoot my videos than a bustling university library located in downtown Montreal. I also feel comfortable and relaxed, which helps.
I don’t fully script my videos, but I do prepare a summary or plan of what I want to cover. Reading text in a video sucks, feels and looks awkward. I’d rather jot down a few reading notes and ad-lib the rest. If I stumble or stater during the shoot, I usually signal to myself to exclude that bit by covering the camera – this trick makes it easy to pick up these error in the post-production.
Structure
I divide my videos in multiple parts.
First, I have a “pitch” where I explain what we will be covering in the video. This cannot exceed 30 seconds. If it does, I cut it down.
Then, I have a “first title” screen. It provides for my credentials and link to the library’s business research portal. This is about 6 seconds long. The text is fixed on the screen for that period. Should students want to read it further, they can pause it then.
Immediately following the title screen, I have a “second title” screen where I name the video and provide a more specific link on the library website to a specialized guide. This is also about 6 seconds long. The text flies from left-to-right with the link on the bottom.
During the two title screens, I play a loop of music a really awesome colleague of mine donated from his DJ console.
Then, I usually have a screen focus on my face for about a minute, to give more details of the resource I will explain. Then, I turn on the image-in-image feature and I guide users in using a resource. I may leave the image-in-image mode during the body of my video to mix things up a bit and break the flow. I aim to provide 2 or 3 topics for a maximum of 2-3 minutes each.
The last 30 seconds of a video are used to quickly recap what we have covered and perhaps offer an option to offer links to additional videos on my channel. YouTube allows you to add links to videos from the Dashboard of a video.
I then have my credentials on the screen again for about 6 seconds, followed by another 6 seconds with the video title and dedicated link on the library website. I make sure to paste the link to the dedicated page on the library website about the resource in the first line of the video’s description. YouTube makes that link active, so YouTube always points to the library website. I have another music loop during this part, slightly different from the one in the introduction, thanks to my awesome DJ-librarian friend.
I then have an “extro” screen branded to Concordia University, a few seconds long. A little branding goes a long way!
My videos will never exceed 10 minutes. It it must, I split the video – it is better to have two 8 minute videos than a long 15 minute one.
Time
It takes me about 30 minutes to shoot a video, and anywhere from 2 to 4 hours for post-production. That means that I can whip out a video in half a day, including rendering time as well as uploading it to YouTube. I could make longer videos, but I find that 10 minutes or less is probably an unwritten rule for keeping an undergrad’s attention on the Internet.
I organize a stream of videos through playlists on YouTube.
Next steps
I hope to work closely with course coordinators to further integrate these videos in the curriculum for capstone courses. For example, they can become part of assignments or additional materials included on the course’s online management system. I am focusing on a few course for now, to maximize the reach, but I can certainly roll the videos out to more niche courses. Or, I can use the time I free up from servicing the core courses to provide for more presence for higher undergrad or grad courses.
I feel this is a new way to service our communities while allocating resources more efficiently. It is also fun and motivating to see your statistics rack up. I may not reach the status of KPop stars, but I will certainly reach more students.
Tip of the had to Kipmusic2345 for her great GarageBand toturials on youtube:
[youtube http://www.youtube.com/watch?v=8MfRHiVHXsU?list=PL919D238C5B8CC8CB&w=560&h=315]
These were really useful for me – I’ve been meaning to start editing sound files for including them in my own digital tutorials.
On the left-hand side (from top to bottom):
– My Blue Yeti ™ microphone with wire
– Sustainable coffee mug
– Manfrotto self-standing monopod
– Black lab notebook
– Kodak Playsport camera with its carry-case (on the lab book)
Middle (from top to bottom):
– MacBook Pro laptop with power cord
– A MacIntosh apple on the laptop for the teacher (Mac-Heads will get the joke)
– A dry-erase board eraser, with a blue marker
– Remote control for data projector
Right:
– A few books used in the demo.
I’m pretty proud to say that I was able to equip myself for less than 2000$ with some decent gear !
I just stumbled on MonDiapason.ca (in French), a site I had seen a demo for 2 years ago at a conference. I’ve heard it may go “live” soon, although there is a lot of content on it already…